
The key to adding pictures is one of the buttons at the top of your edit box. It looks like this:

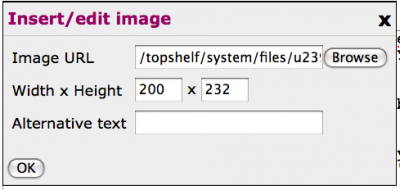
If you click on it, a little box will pop up that looks like this:
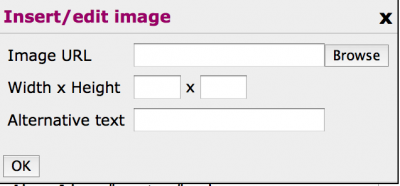
This new box allows you to do one of two things, you can enter the URL of a picture from the web in the field labelled Image URL*, or you can click on the ‘Browse’ button to either select preloaded pictures from your picture directory (if you've already loaded some) or you can click on yet another ‘Browse’ button at the bottom on the resulting selection box to choose a picture off your own hard disk. I shrank the size of this box down to almost nothing in the image below, so you can't see most of the box yet. Ignore the top of the box entirely.
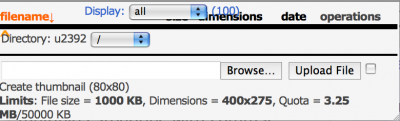
To load something from your hard disk, you'll have to look at the bottom of this box. There are two important buttons, first the ‘Browse’ button, which will pop up a directory listing, from which you'll select your picture. Here's what they both look like:
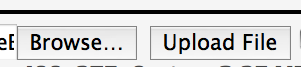
Once you select the picture, click on the second button, the ‘Upload File’ button, or it will stay on your hard disk and never be copied to your picture directory on Big Closet.
Eventually, you'll see the screen change so that looks like this:
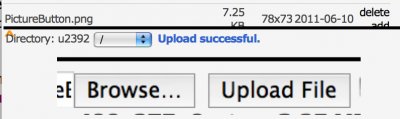
Note that your picture will be displayed, so you can easily see if you got the right image when you selected the original file.
It might have another "success" message, which means that the picture was too big, and had to be scaled to fit the maximum allowed size. Here's what it looks like:

This is a good thing, because it's courteous to readers who don't happen to have a T1 line run to their home or office. It's a good thing for you as well, because you won't have to fiddle with graphics editing programmes to tweak your pictures.
Now, there's only one step left; you have to look at the top of the box we ignored before and choose the picture you've just uploaded from the user directory listing shown at the top of your screen. Don't select ‘Delete.’ Select ‘Add.’ The same ‘Insert/Edit’ box will pop up that we saw at the start of our little journey, except this time it will have the URL box filled in. Now click the ‘OK’ button. All the fancy HTML text needed to insert a picture is now inside your text.
You can use the ‘Preview’ button at the bottom of the Edit screen to see how it looks.
Voila!
Puddin'
* Taking pictures directly from the web isn't usually a good idea. In the first place, a lot of pictures on the Web are a lot larger than many Big Closet readers can comfortably download, if they have slow connections to the Internet, and it causes Erin's server to access the Web every time a Big Closet reader views your story or blog entry, which slows things down for everyone. URL accesses take time. Time is money.
Comments
Thanks Puddin'!
[email protected] I know Bobbie-C posted 'BCTS For Dummies'. I'm definitely one of those!(giggles) Just never had the patience to go through it all.;0 I know this question has been answered numerous times. Yours is one of the most concise I've seen.(No offense to anyone else!)
Thanx,
Love And Hugz,
Jonelle-Elise(Always Bailey's Cuter Half);)
[email protected]
Double-checked
I just double-checked my fiction input page (or whatever you want to call it) and mine looks nothing like that. I just have a line at the bottom of the text box saying
"Insert image or link". In fact about the only thing I recognize is the bit about uploading to BC.
* * *
"Girls are like pianos, when they're not upright they're grand!" Benny Hill
Karen J.
“When a clown moves into a palace, he doesn’t become a king. The palace becomes a circus.” - Turkish Proverb
Little Boxes, Little Boxes...
Insert image or link should take you to roughly the same place, but slightly quicker, if you choose the insert image selection. This opens the third image down on my sequential list.
In your Account settings, you'll see an entry labelled:
If it's checked, you'll see the buttons I describe, which also allow a reasonable amount of HTML code to be entered without actually knowing anything about HTML.
If it's not checked, you're on your own. This is not a terrific disadvantage, since HTML is a fairly simple formatting tool.
Cheers,
Puddin'
A tender heart is an asset to an editor: it helps us be ruthless in a tactful way.
--- The Chicago Manual of Style
-
Cheers,
Puddin'
A tender heart is an asset to an editor: it helps us be ruthless in a tactful way.
--- The Chicago Manual of Style
...and they're all made out of????
....ticky tack?
Dio vi benedica tutti
Con grande amore e di affetto
Andrea Lena
Love, Andrea Lena
Ticky tack? Well DUH!
I grew up in the 60's way back when when Puff the Magic Dragon was a song about a boy and a dragon.
John in Wauwatosa
P.S. See, it's a lie. There was never anything countercultural about the 60s.
Plus if *I* can post a picture here *anybody* can.
John in Wauwatosa
John, John, John (sigh!)
It was never about a boy and his dragon! (shakes head slowly)
Let me help you out, okay? Watch your mail for a box of brownies. Eat two (ONLY two!), then check back in about an hour. Okay?
* * *
"Girls are like pianos, when they're not upright they're grand!" Benny Hill
Karen J.
“When a clown moves into a palace, he doesn’t become a king. The palace becomes a circus.” - Turkish Proverb
Can I have a glass of chocolate milk with the brownies?
I'm feeling naughty.
John in Wauwatosa
P.S. Next you'll tell me Lucy in the Sky With Diamonds was not inspired by a child's colorful drawing.
P.P.S. No really. Posting pictures is easy.
John in Wauwatosa
Have you figured out?
Judy In Disguise, With Glasses? :)
* * *
"Girls are like pianos, when they're not upright they're grand!" Benny Hill
Karen J.
“When a clown moves into a palace, he doesn’t become a king. The palace becomes a circus.” - Turkish Proverb
Checked - I checked
RTE is checked, and I don't see those buttons. I've been pretty much hand-coding the HTML when I post a story. And given my brain's use of chicken wire to sieve any input, that means any HTML use is very minimal! :(
* * *
"Girls are like pianos, when they're not upright they're grand!" Benny Hill
Karen J.
“When a clown moves into a palace, he doesn’t become a king. The palace becomes a circus.” - Turkish Proverb
BigCloset Theme
If I remember correctly, you don't use the BigCloset theme but one of the other themes I supply. That may be why you don't see the buttons.
Hugs,
Erin
= Give everyone the benefit of the doubt because certainty is a fragile thing that can be shattered by one overlooked fact.
= Give everyone the benefit of the doubt because certainty is a fragile thing that can be shattered by one overlooked fact.
Hey you got an edit box!
I never did so post my works exclusively to FM.
Too difficult for a dummy like me to comprehend how to post the written word on this site let alone consider pictures.
Love to visit occasionaly and read some wonderful story contributions though.
Don't understand this
I've heard this objection before but cannot understand this. How is BC's submission procedure more difficult than FM's? Makes no sense to me. FM's submission process seems much HARDER to me. I can't figure out how to make BC's easier than it is with all the info that is needed. At FM, it's not all on one page even, since uploading the story is done by email, reference to another site or a separate file upload.
What is the problem? I've asked others who have complained about BC being difficult and never got an answer.
Facebook baffles me but BC is simple.
Hugs,
Erin
= Give everyone the benefit of the doubt because certainty is a fragile thing that can be shattered by one overlooked fact.
= Give everyone the benefit of the doubt because certainty is a fragile thing that can be shattered by one overlooked fact.
Not only is BC easier....
....it's much easier on the eye; easier to read if you have vision problems, and the graphics can't be touched by any other fiction site. I'm completely nonplussed over that, and I can't imagine things being much better than they are here. I'm shocked...I tell you...shocked!!!! BC Rocks!!!!
Dio vi benedica tutti
Con grande amore e di affetto
Andrea Lena
Love, Andrea Lena
I quite agree...
Almost everything is very straightforward, and the edit buttons allow naïve users, or creative right-brain types, to perform non-trivial formatting of stories quite easily. Even a simple ‘screen-scrape’ results in a fairly decent output. One can easily distinguish this site from almost every other site by the (fairly) consistent high quality of the typographical layout, which allows stories to be read easily.
Cheers,
Puddin'
A tender heart is an asset to an editor: it helps us be ruthless in a tactful way.
--- The Chicago Manual of Style
-
Cheers,
Puddin'
A tender heart is an asset to an editor: it helps us be ruthless in a tactful way.
--- The Chicago Manual of Style
pickchas
Hmmm, having played a teensy bit with html for fonts n stuff without blowing up the site I'll have to look at this. Tiptoe around it a few times and peer into the guts, kick a tyre. Mebbe.
As for posting, I haven't at FM for a while but it was never hard really. Just took some time and you can't easily tweak.
Here is easy peasy. Just step through the boxes, cut and paste and preview the look, close eyes, swallow, squinty peek and press enter. Done. In terms of overall simplicity, instant access, editing facility, pretty pictures, fonts etc, very hard to beat. Plus if you screw up there's usually someone about to rescue you soon enough.
Kristina
I posted one story.
I posted one story and was mortified to see my effort "blow up" the front page.
My attempt failed to accomplish my intentions but thanks to Sephrena she salvaged my effort.
I do not understand "html" so I e-mail my stories to FM with the reqiured description and 24 hours later it is posted. (I write using office 10 and format to plain text)
By the way Gwen thankyou for e-mailing "BC for Dummies" to me many months ago. I was still too dumb to understand it.
My problems with BC posting...
Are mostly because I have a slight cognitive dissonance. In my last posting, I had finally understood that my paras needed two spaces between them. So when I initially wrote it, the prose seemed strange but posted it looked fine.
Some might think me to be really bright, but certain learning functions are a real challenge, and that is mostly due to a dark area on the right side of my brain in the frontal lobe. For now we are assuming it is nothing more than an old injury.
Gwen